CSS: Transform (Transform objects)
Theory: 2D transformations and tilt
The final thing you can do within 2D space using the transform property is tilting or skewing elements. We achieve this transformation by tilting objects along one or two axes simultaneously.
Don't confuse rotate and skew — rotate is for rotating the element, and skew is for transforming it by tilting it. We often use these features together to create animations.
Let's look at how exactly the element changes when we use the skew function. To demonstrate, take a rectangle and tilt it 45 degrees to the left. From CSS's point of view, it's a simple operation that looks like this:
At first, it may seem unclear exactly how we transformed the element. Let's break it down in order:
- As with the other functions, the
skewfunction is common to theskewXandskewYfunctions. In this example, we only used thex-axistransformation 45deg. In the lesson about rotating an element, we described all the basic units of measurement that cover rotation operations
We use the same units to tilt the element along the axes with the skew function. The value used in the example is 45deg, which means 45 degrees to the left. If we use negative values, it'll skew to the right.
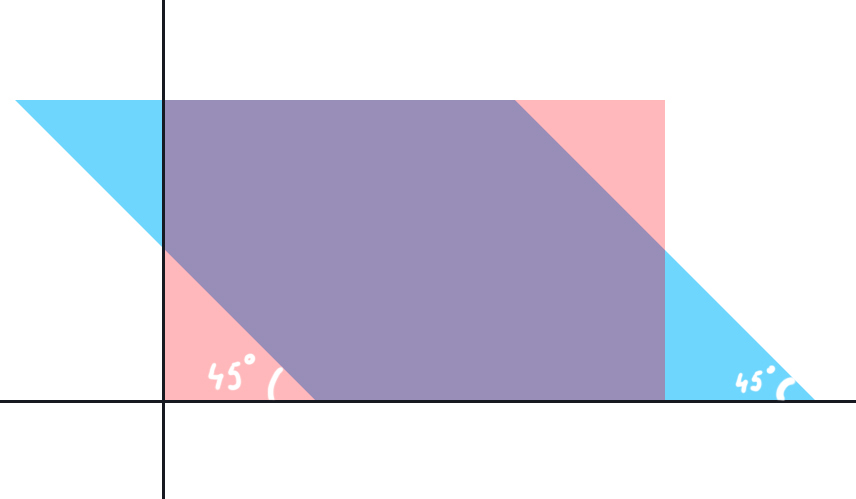
Let's look at the following image to understand where 45 degrees is in the example:

It shows the element's original position in red and its final position in blue. You could say that the browser took both sides of our rectangle and tilted them 45 degrees. The resulting angles we see in the image.
As with other transformations, skew affects not only the block to which it is applied but also all nested blocks. You see it in the text inside the blue block of the first example.
There's a small but beautiful solution we can use to avoid this. We create a separate container for the inner block and specify the opposite value of the skew function. For example, if the block tilts 45 degrees horizontally, the content should tilt minus 45 degrees horizontally. It is one of the most frequent operations when using skew:
It's important to note that when using this technique, you should always pay close attention to the content inside. The point is that by expanding it, we have distorted the content relative to the parent block. In this situation, you'll likely lose some of the content because it goes beyond the parent block:
The usage of skewY differs fundamentally only in the axis along which the transformation occurs. The rotation is not along vertical lines as in the case of skewX but along horizontal lines.
Because of this, the transformation is more evident as the reference point for the eye changes. With skewX, the element itself was on the x-axis and didn't move, but with skewY, this reference point for the eye disappears:
The example above shows how we transform the element using skewY. The red block shows an animation of the transformed object. The green block is the element after using skewY(45deg).
Note the vertical lines showing the y-axis. The element is not deformed along the x-axis since the lines are always straight.
Additional assignment
Using the examples above, try to deform the element simultaneously along two axes.
Recommended programs
Completed
0 / 7

